Upload Images to and from S3
Amazon S3 (Simple Storage Service) provides object storage built for storing and recovering any amount of information or data from anywhere over the internet. It provides this storage through a web services interface.
What you'll learn
In this guide, you would learn:
- How to connect and configure the S3 datasource.
- How to use the Image and Camera widget.
- How to upload/download images using S3.
Create S3 Datasource
To add an S3 datasource, navigate to Explorer >> Click plus sign (+) (next to S3)>> Select S3 under Databases. Once your S3 datasource has been created, follow these instructions to connect your app to the S3 database.
To upload your data to Amazon S3, you must first create an Amazon S3 bucket in one of the AWS Regions. Create a new bucket.
Upload image using Camera widget
The camera widget powers you to capture images and videos from your applications and share the data for further use. In this section, you learn how you can upload images/videos to Amazon S3.
- Drag and drop the Camera widget onto the canvas.
- Click the + icon next to the queries/js and choose your S3 datasource.
- Rename the query.
- From the Commands drop-down, Select the method Create a new file.
You can pass the below parameters to Create a new file.
- Bucket Name: The object key (or key name) uniquely identifies the object in an Amazon S3 bucket.
- File Path: Path of the location you want to store the file. For example,
images/any.
Intermediate folders not existing are automatically created.
- File Data Type: You can choose between Base64 and text as your file data type. You should select base64 when uploading data from the camera widget.
- Expiry Duration of Signed URL (Minutes): The timestamp at which the signed URL would expire.
The maximum expiration time for a signed URL is one week from the time of creation.
- Content: You can manually add data into the Content field by writing an object with a text and data property, or you can fetch data from the camera widget like below:
{
    "data": "{{Camera1.imageDataURL}}"
}
Once you have added all the required parameters:
- Open the Camera widget property pane.
- In the OnImageSave event, choose your query from the "execute a query" option.
When you capture and save the image, your upload_image query is executed. You can visit the S3 console to see the uploaded media.
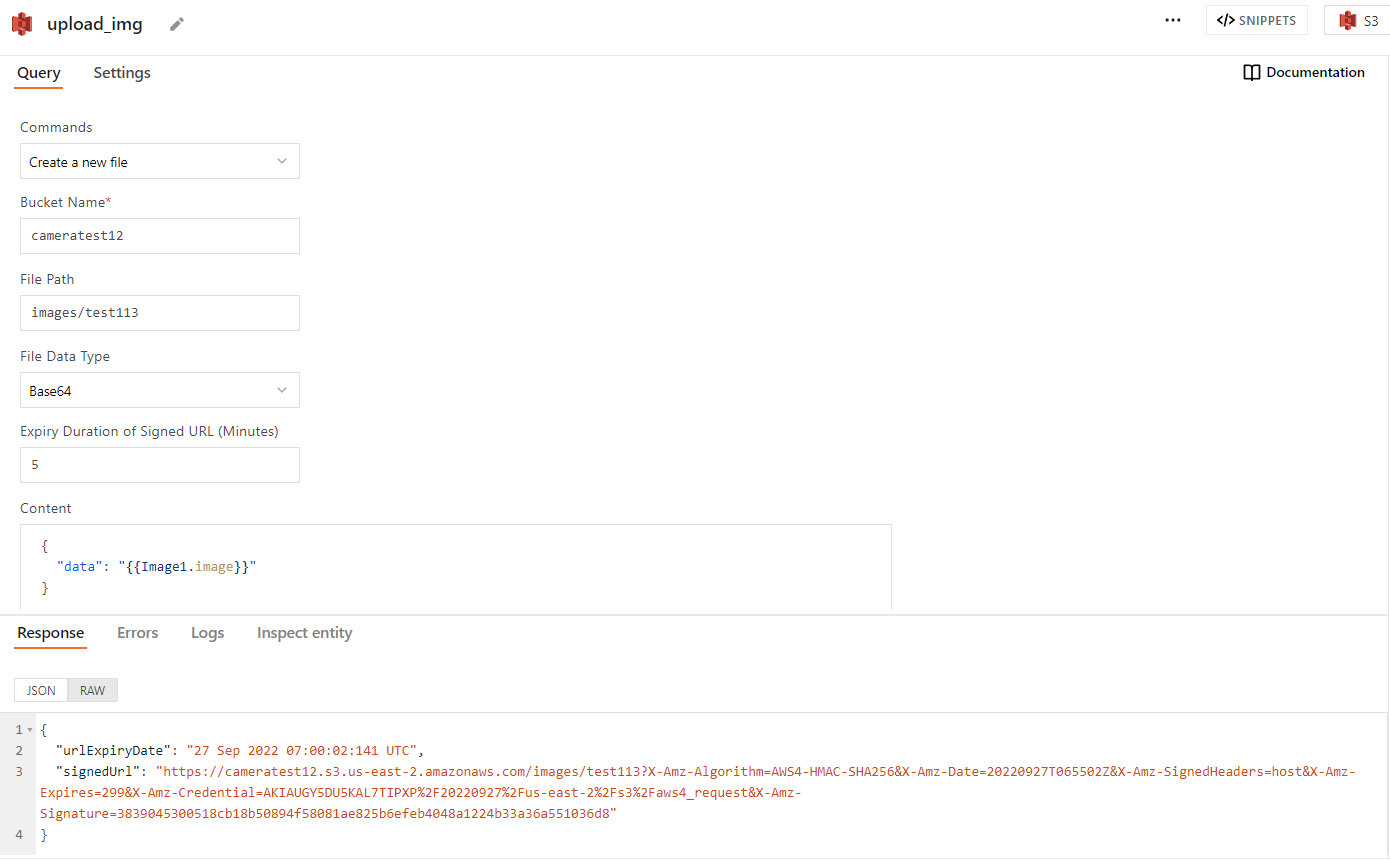
Upload image using Image widget
The Image widget displays the images in your app. Images must have a valid base64 or a URL. You can follow similar steps to the image widget.
- Drag and drop the Image widget onto the canvas.
- Now set the image URL in the Image property pane.
- Click the + icon next to the queries/js and choose your S3 datasource.
- Rename the query.
- From the Commands drop-down, Select the method Create a new file.
You should select base64 as File Data Type when uploading data from the image widget.
In the content body, add the following:
{
    "data": "{{Image1.image}}"
}
Once you have added all the required parameters:
- Now, set the Image Widget's
onClickevent to execute a query, and choose your query.
Your image is stored in the S3 database once you run this query. Let's look at how to fetch an image from the S3 database.
Download the image
Fetch Single File
- Click the + icon next to the queries/js and choose your S3 datasource.
- Rename the query.
- From the Commands drop-down, Select the method Read file.
You can pass the below parameters to Read a file.
- Bucket Name: Name of the bucket where the image is stored.
- File Path: Path of the image you want to fetch. ex. images/name.
- File Data Type: You should select base64 to display the image.
Once you have added all the required parameters:
- Drag and drop the Image widget onto the canvas.
- In the Image property pane, add:
{{<your_query_name>.data.fileData}}
Fetch all files
- Click the + icon next to the queries/js and choose your S3 datasource.
- Rename the query.
- From the Commands drop-down, Select the method List files in the bucket.
- Add the bucket name.
- Now, run the query.
Now, open the query window and select the table option on the right-side property pane. It would automatically add a table widget to your canvas.
Bind the query’s response to the Table using JavaScript in the Table Data Property {{list_files.data}}.
Now your table should list all the files present in your S3 bucket.
You can use an image widget to display images listed in the table widget. You can follow this guideto learn more.
Download Files
- Open the image property pane.
- Click the JS button next to the
onClickevent and write the following JavaScript query:
{{download(atob(Fetch_image.data.fileData),'Testname','image/png')}}
Now, your image is downloaded when you click on the image widget.
You can check this Guideto learn more about Upload/Download Files from S3.
With Appsmith S3 integration, it is possible to create apps that seamlessly connect with the S3 database and provide additional flexibility for updating and analyzing data.

