Database GUI
⭐ Level - Beginner
⏱️ Time - 15 minutes
This tutorial guides you through the steps to create a simple database GUI using Appsmith. The application connects to a sample PostgreSQL database, allowing you to read and update user information. You'll learn to:
- Create a new application
- Connect to a database and fetch data
- Display the data in a Table widget
- Build form to view user details
- Edit and submit the user details
- Deploy the application
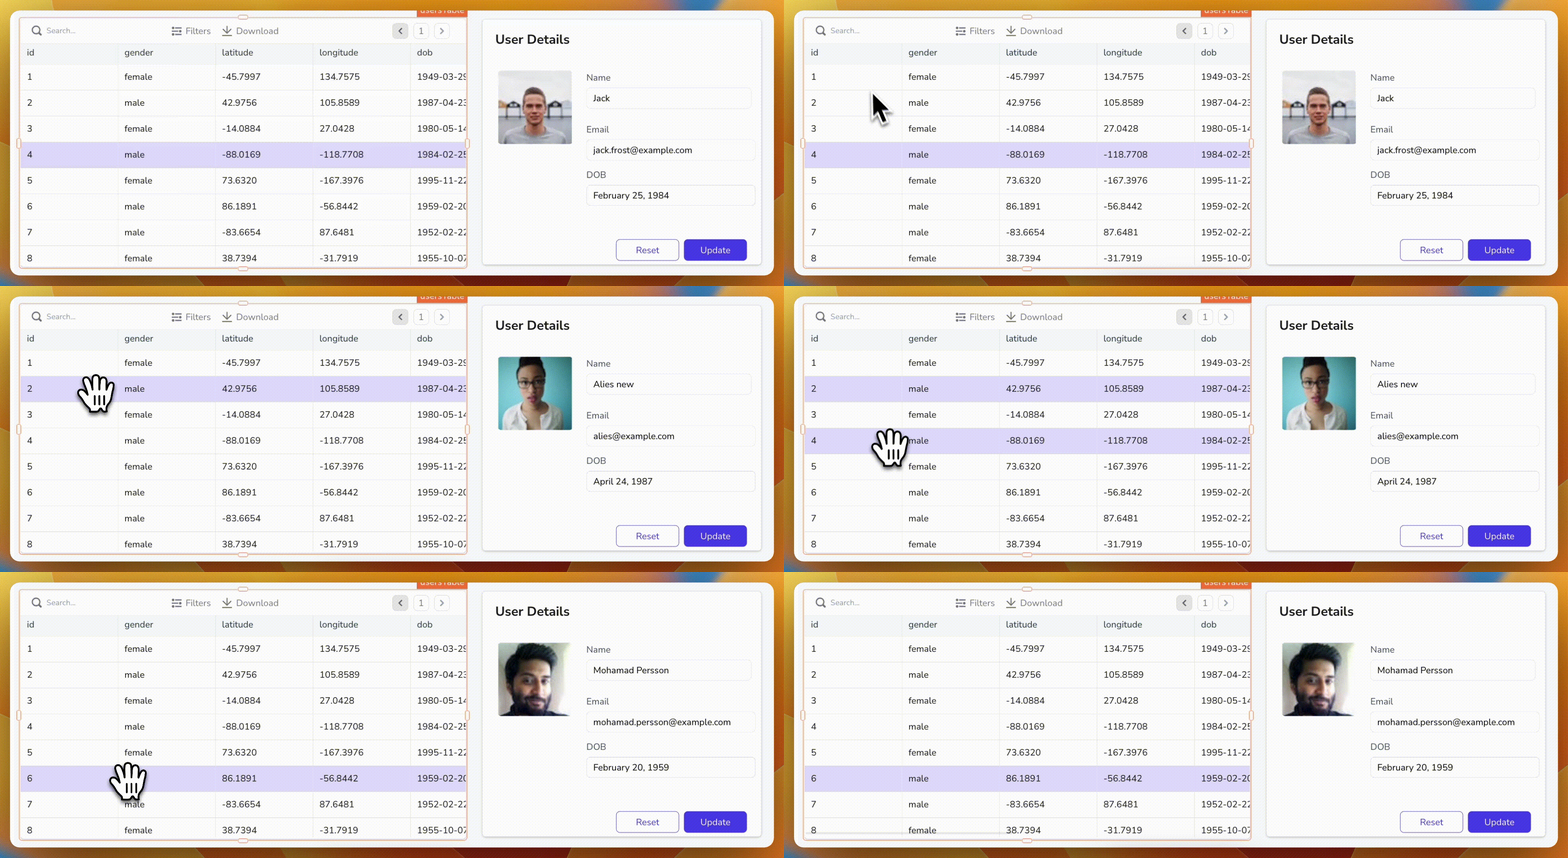
Here's a screenshot of the final result:
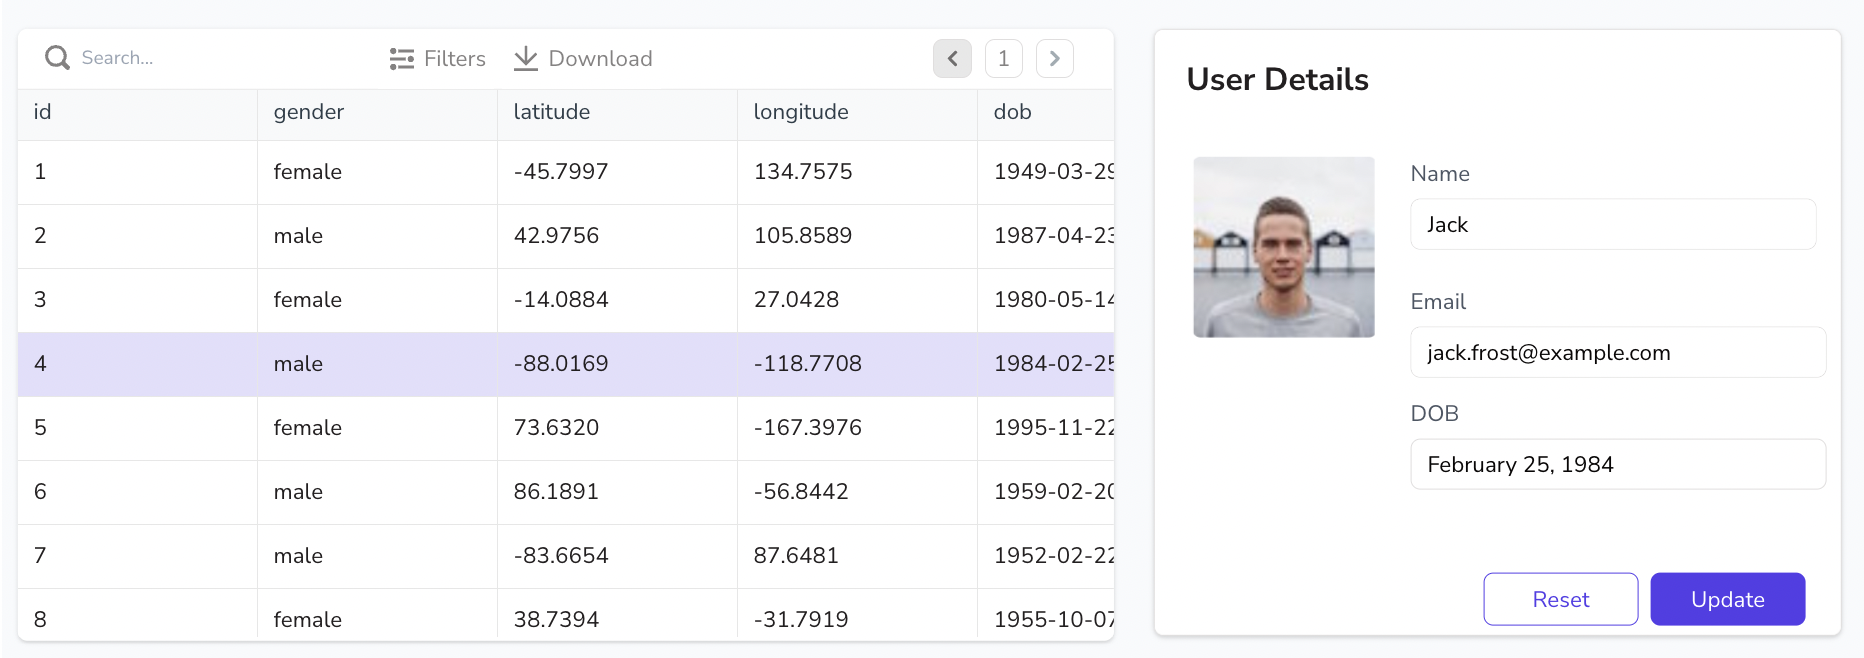
Let's get started!
Prerequisites
- An Appsmith account. If you don’t have one, sign up on Appsmith cloud.
Create a new application
When you create a new account, Appsmith adds a workspace with an application titled My first application on the homepage by default. You need to create a new empty application for this tutorial. If you are inside an application and need to go to the homepage, click on the Appsmith logo at the top left of the screen to go to the homepage.
On the homepage, click the + New button to the right of the screen under the default workspace. You'll land on a new application in the Edit mode.

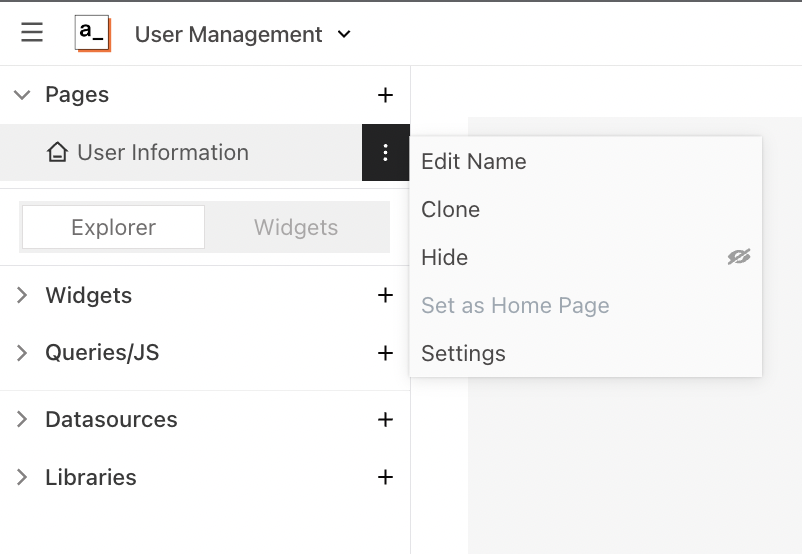
Click the ⌵ icon on the top left next to the default application name. Select the Edit Name option. Rename the app to
User Management.On the Entity Explorer to the left of the screen, you'll see that Page 1 is the default page on the application. Hover over the page name and click the ︙ icon.
Select the Edit Name option. Rename the page to
User Information.
Connect to a database
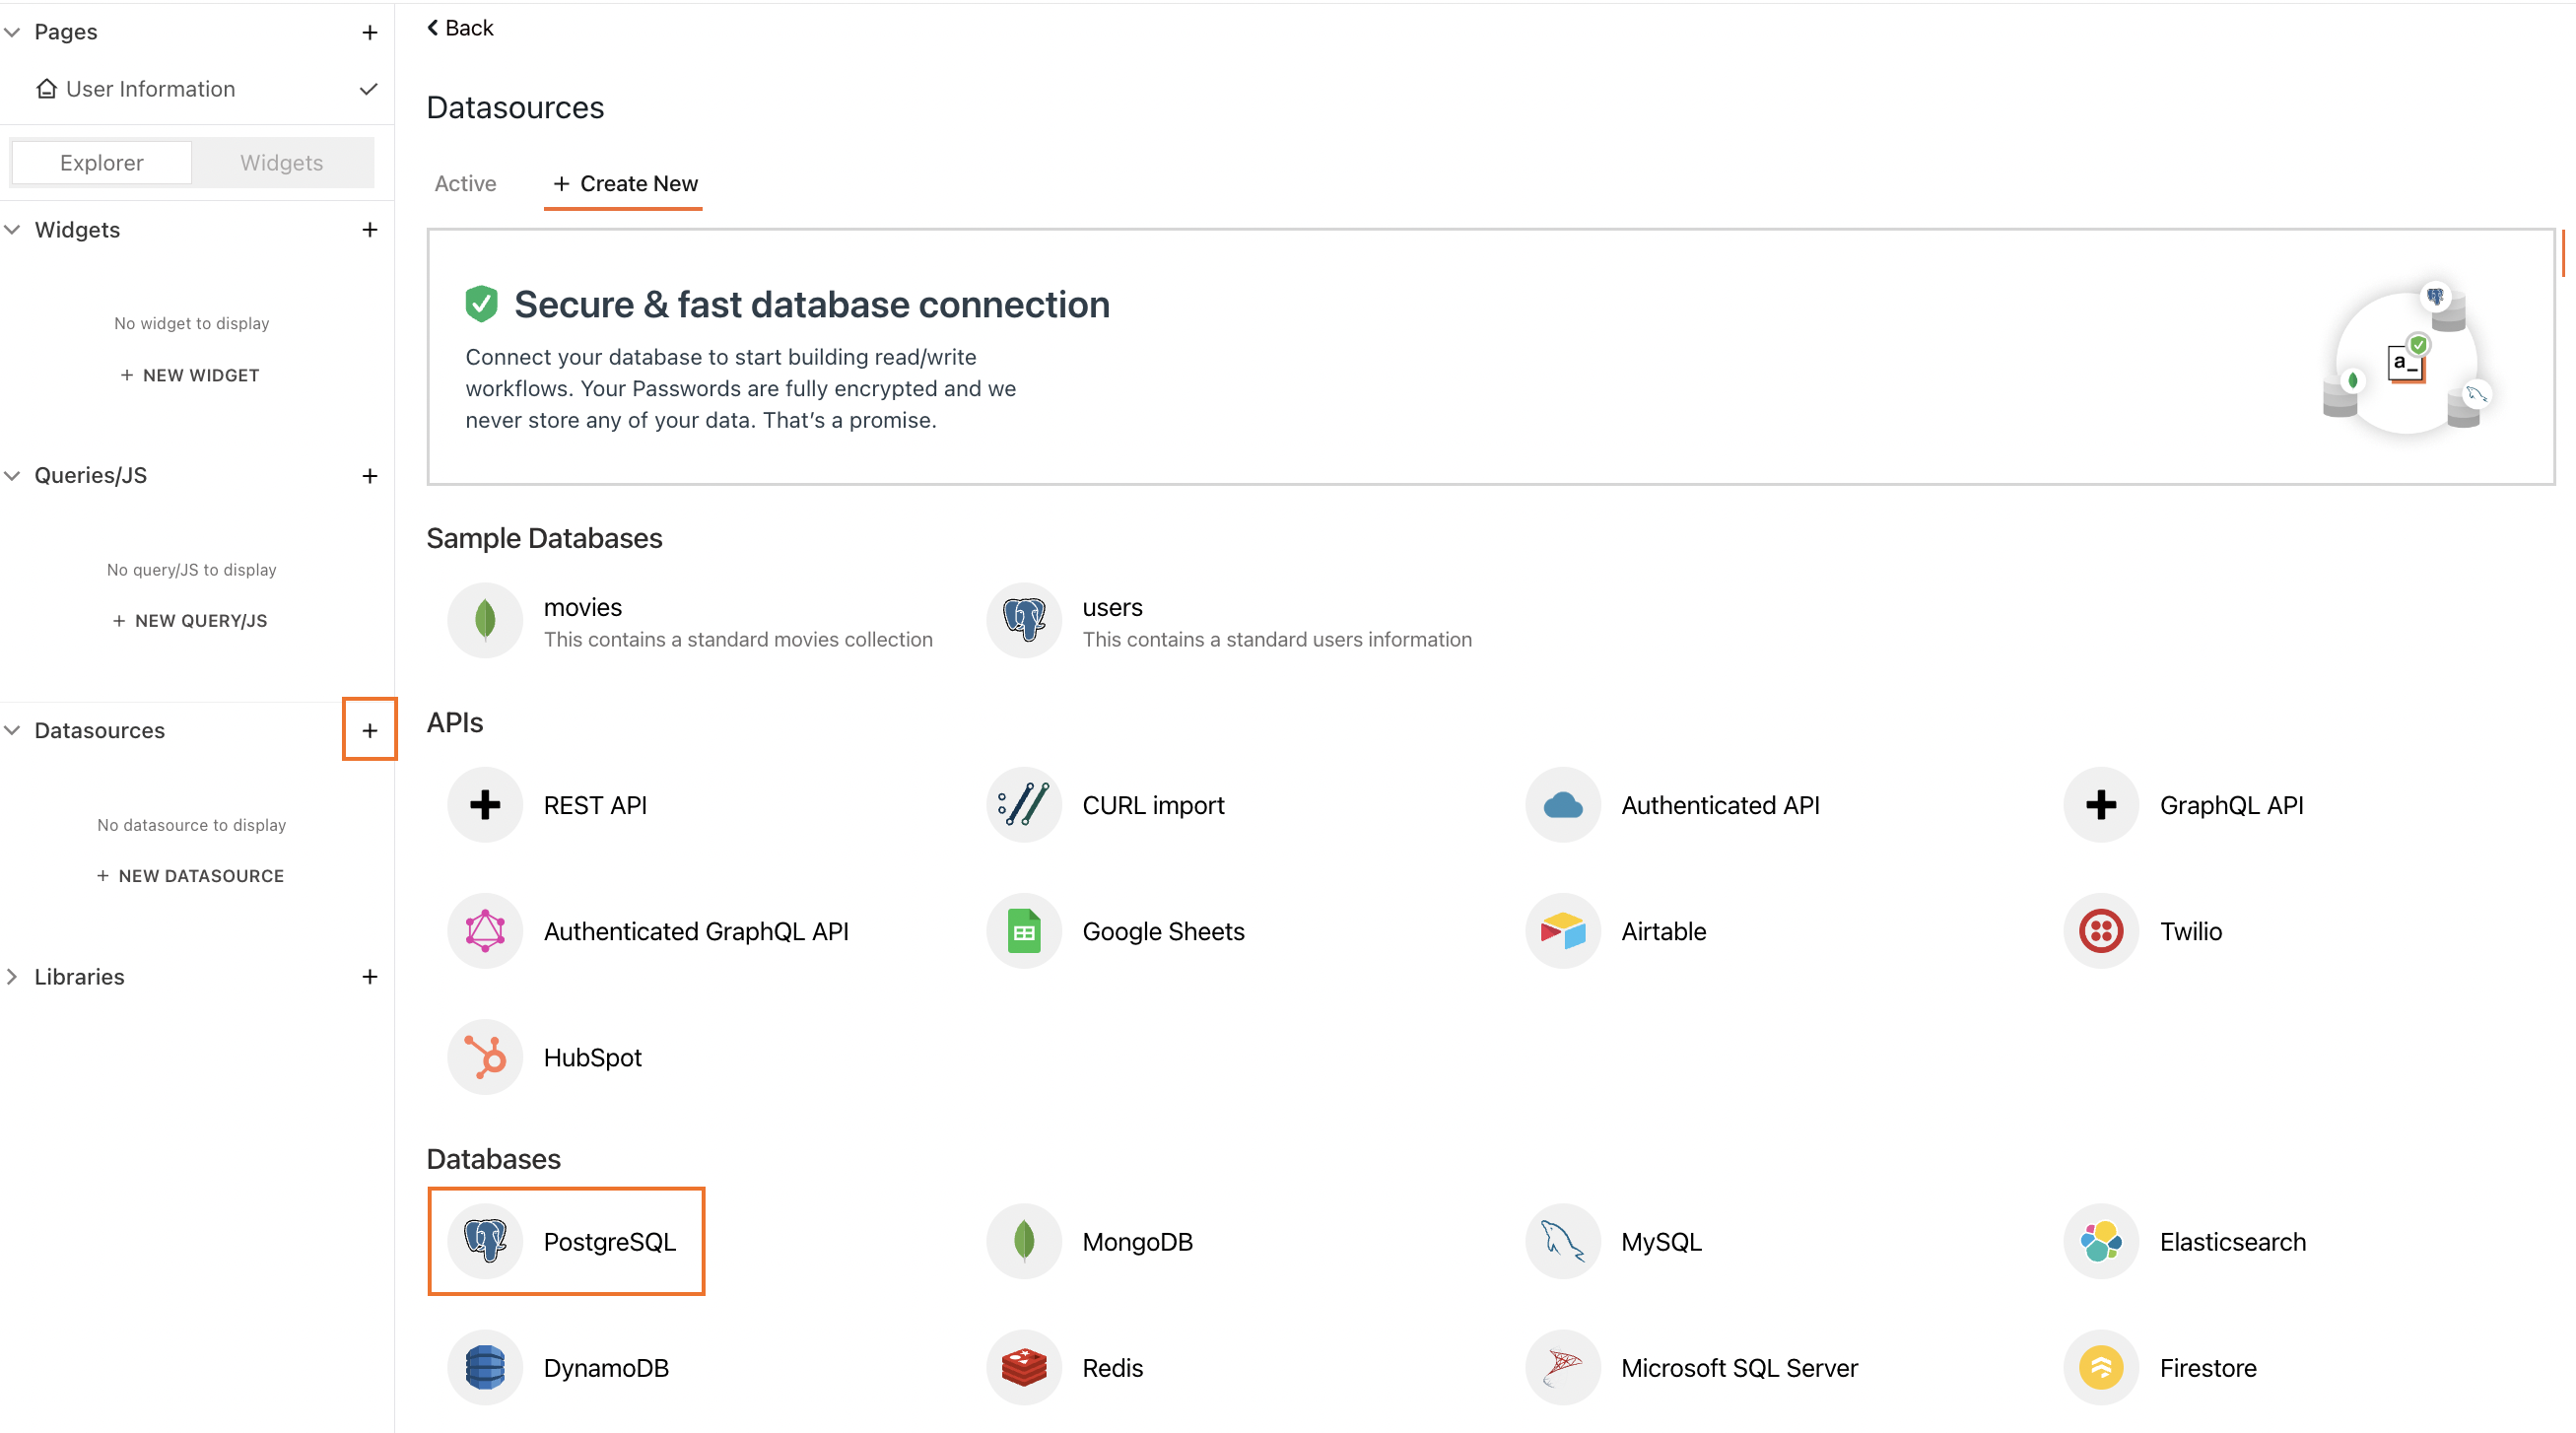
On the Entity Explorer to the left of the screen, ensure you are in the Explorer tab.
Click the + icon next to Datasources to add a new datasource.
Select PostgreSQL under the Databases section. This opens the page where you can configure the fields to connect to your PostgreSQL database.
Click the pencil icon next to the default database name on the top left and rename the database to
usersTutorialDB.Enter the following details in the connection parameter fields:
Host Address:mockdb.internal.appsmith.com
Port:5432
Database Name:users
Username:users
Password:new-users-db-passClick the Test button to test the connection and ensure the database is valid.
Click Save to create and save the database connection. You'll see the
usersTutorialDBdatabase page.
🚩 You've successfully connected to the PostgreSQL database that contains user information.
Fetch user data
- Click the + New Query button to the right of the screen.

Click the Select query template from the list of query commands. It loads the query editor with a fetch query to pull ten records from the
usersTutorialDBdatabase table.Click the pencil icon to rename the query from Query1 to
getUsers.Click the Run button on the top right of the screen to execute the query and confirm that it returns data.
Click the Settings tab. Switch on the Run query on page load option.
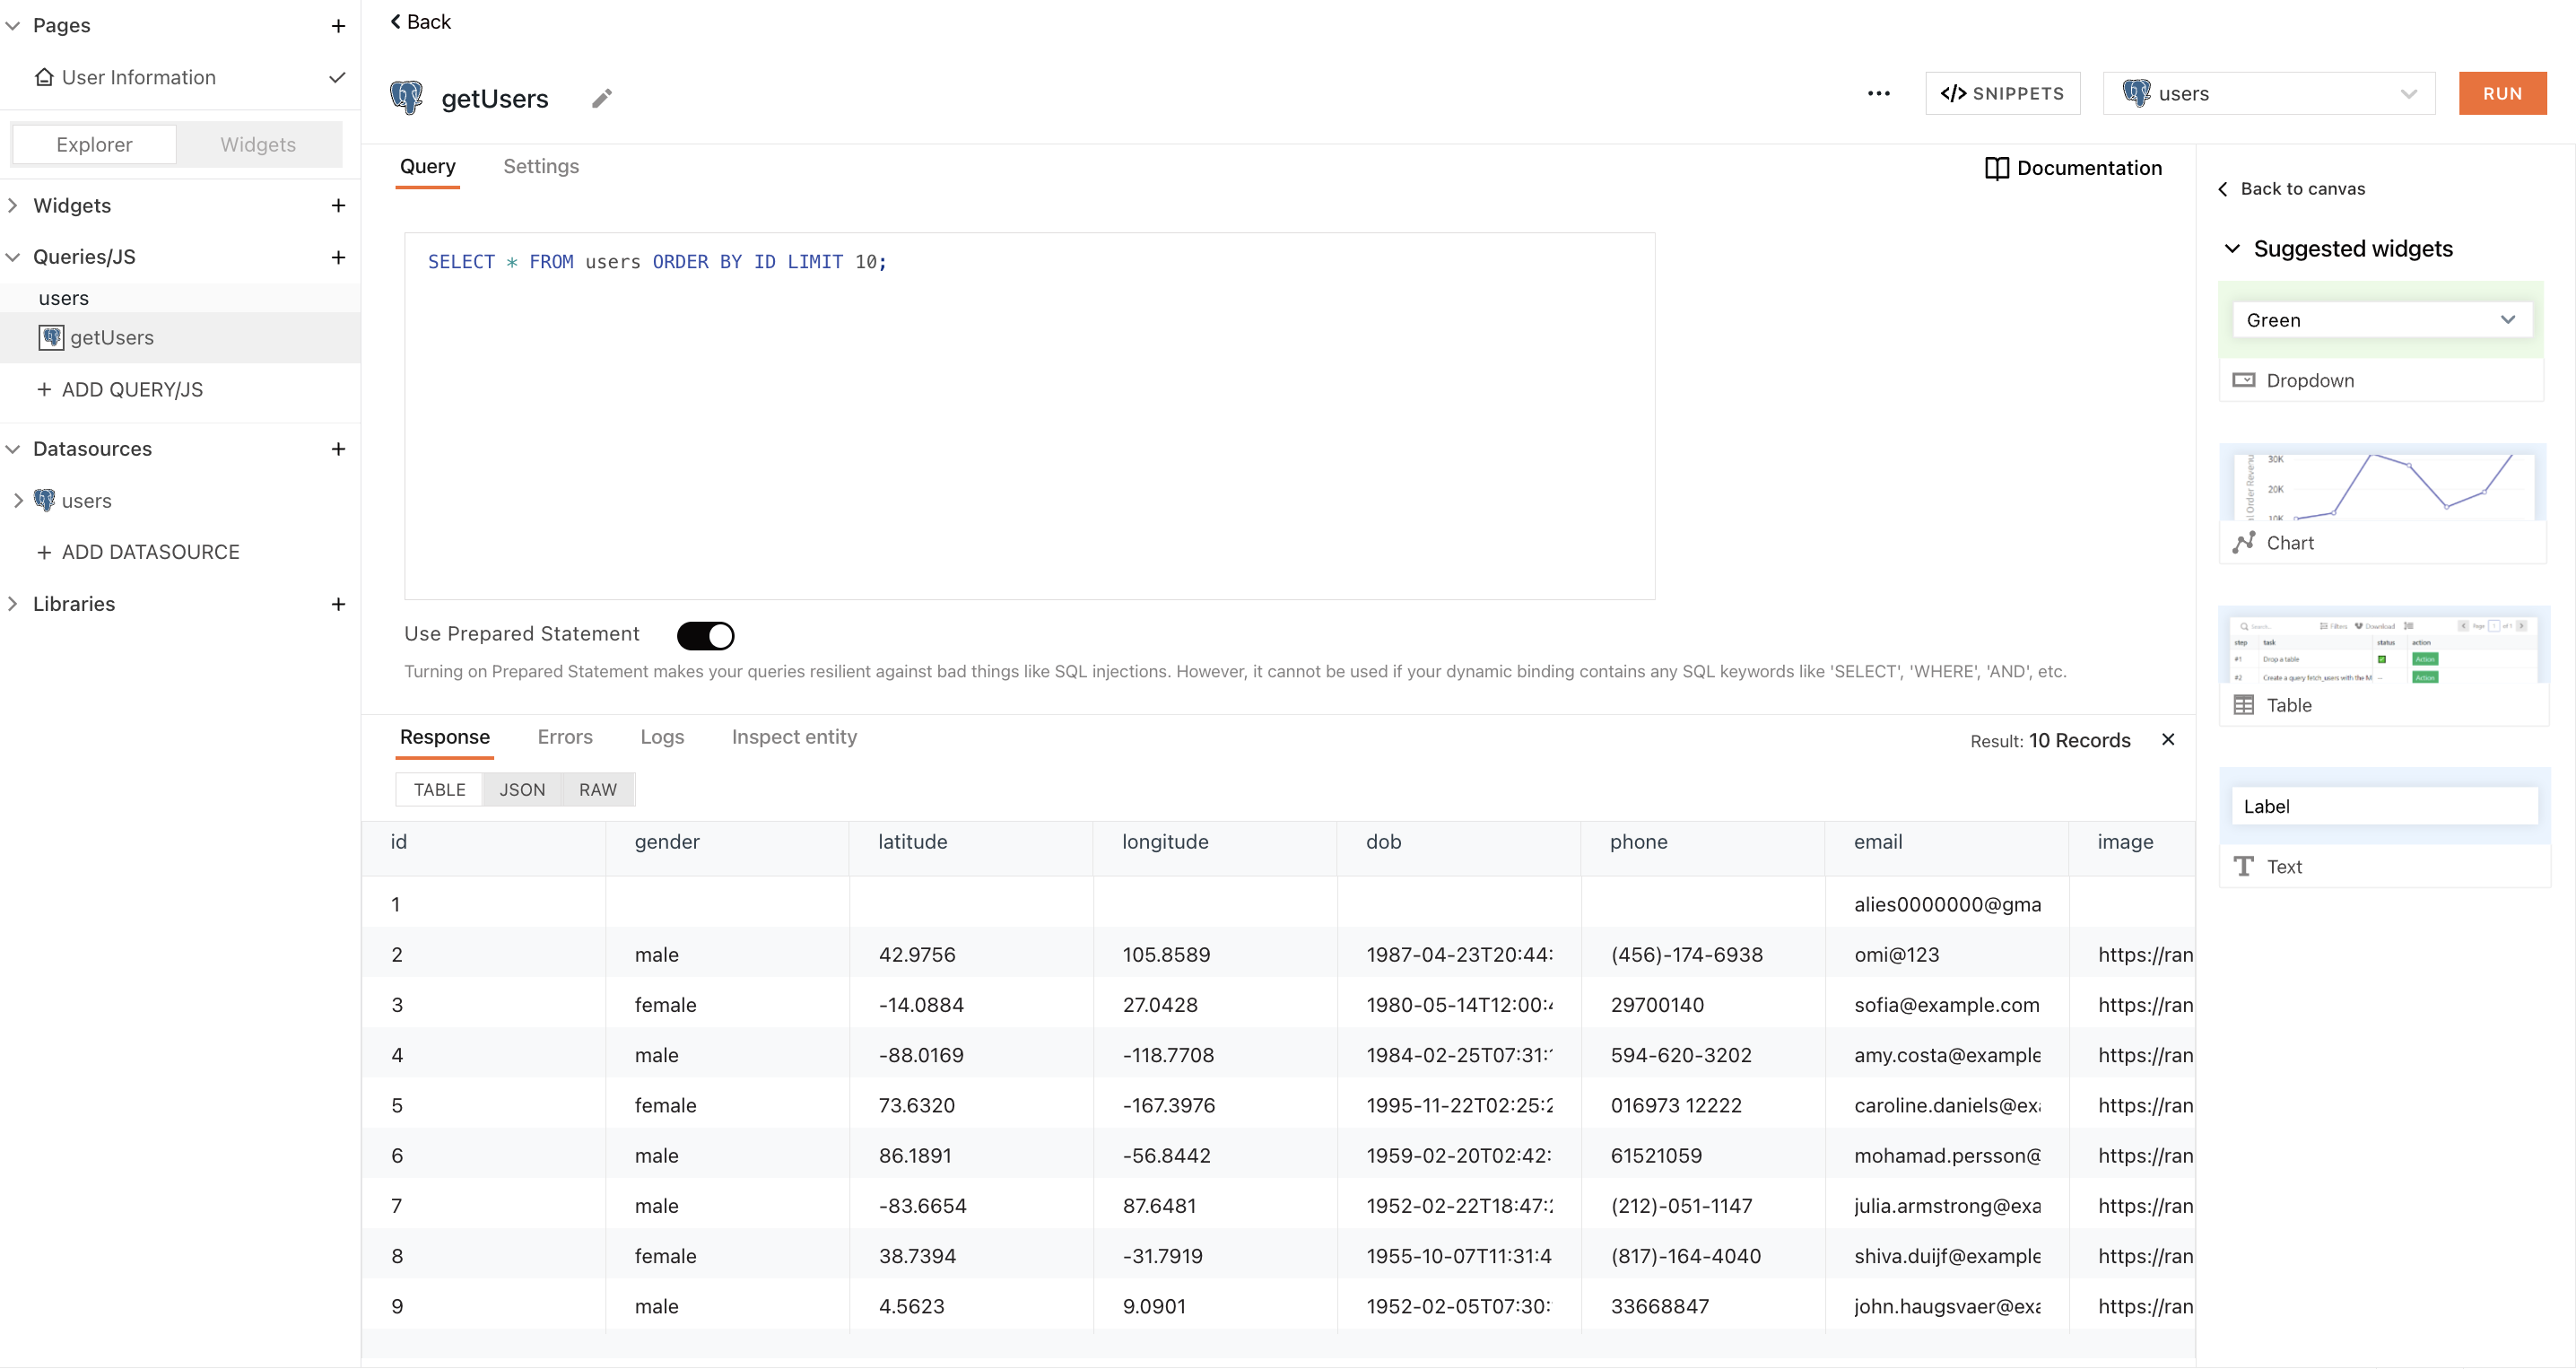
🚩 You've created your first query to fetch the list of users in the database.
Display user data on Table
Click the Widgets tab on the Entity Explorer to the left of the screen.
Drag a Table widget and drop it to the left of the canvas.
A Property Pane appears to the right of the screen, which contains all the properties of the widget. On the top of the property pane, click on the default name Table1 and rename it to
usersTable.In the Table Data property box, delete the default JSON data.
To display the data from the getUsers query, type in the mustache template
{{}}. EntergetUsers.databetween the curly braces. This JavaScript expression connects the data from the getUsers query to the Table widget.
The mustache template {{}} is used to write JS code inside widgets and queries on Appsmith.
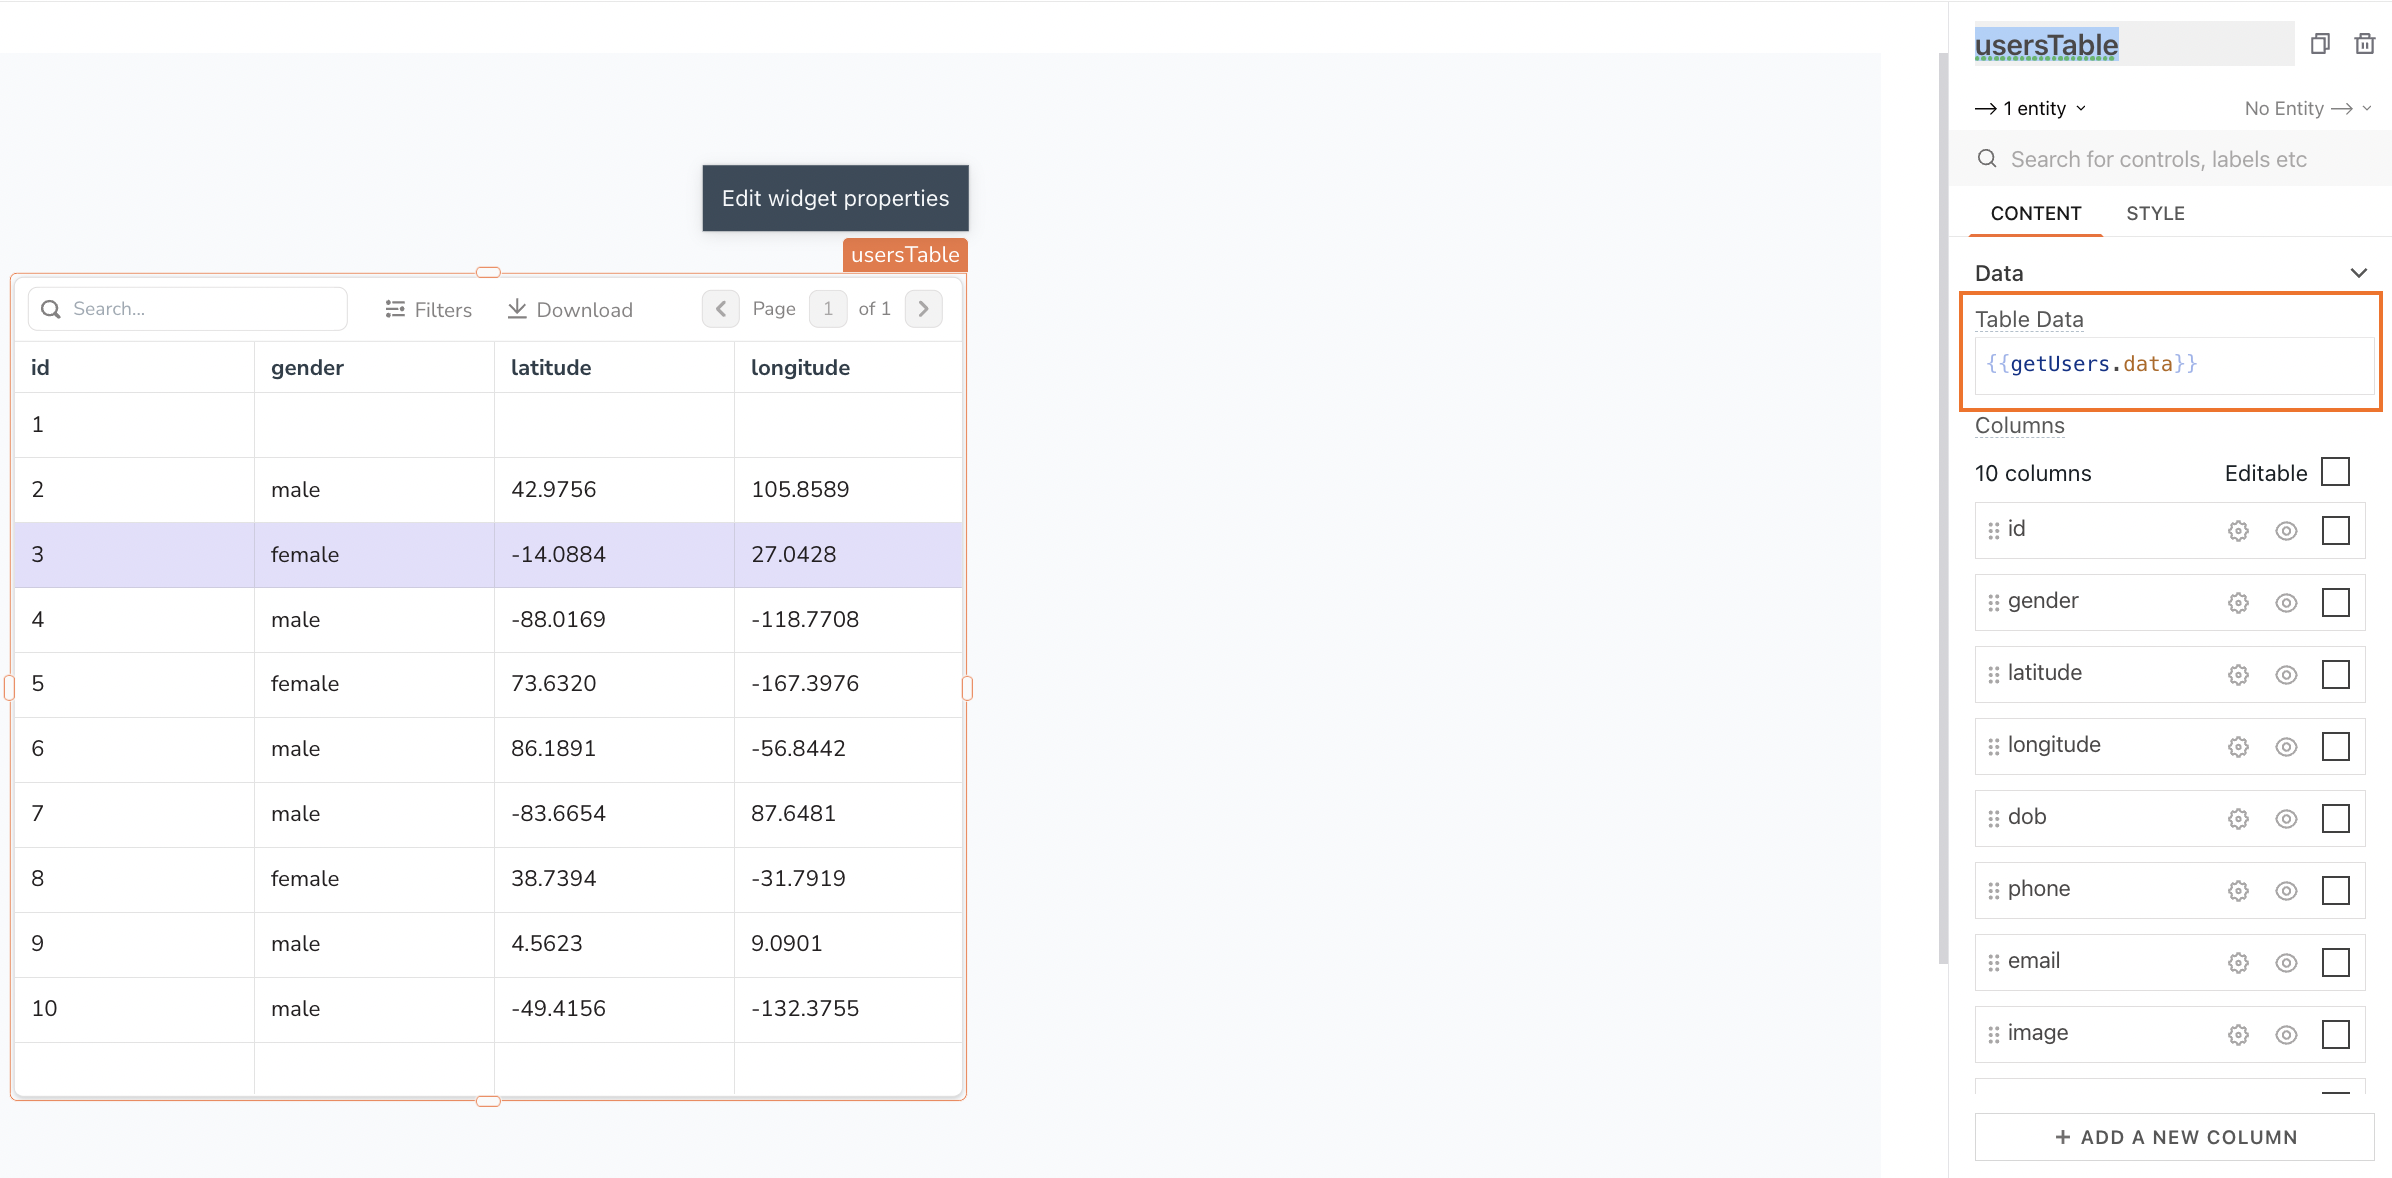
🚩 You've displayed the results from the getUsers query on the Table widget.
Build form to view user details
- From the Widgets tab, drag and drop a Form widget on the canvas to the right of the Table widget.
- Select the title of the Form. On the property pane to the right of the screen, in the Text property box, change the title from Form to
User Details. - Now add widgets on the Form to view user details. For the user's name, drop an Input widget inside the Form.
- On the property pane to the right, click on the default name Input1 and rename it to
nameInput. - In the Text property box, enter
Name. - In the Default Value property box, type
{{usersTable.selectedRow.name}}. This displays the user's name of the selected row on the usersTable Table widget.
- On the property pane to the right, click on the default name Input1 and rename it to
- Let's do the same for the user's email. Drop another Input widget inside the Form.
- Rename the widget to
emailInput. - Select Email from the list of options in the Data Type property.
- In the Text property box, enter
Email. - In the Default Value property box, type
{{usersTable.selectedRow.email}}.
- Rename the widget to
- You also need to view the user's date of birth. Drop a Datepicker widget inside the Form.
- Rename the widget to
dobInput. - In the Text property box, enter
DOB. - Click the JS button next to the Default Date property to connect the Datepicker widget to the user's date of birth on the Table.
- Type
{{usersTable.selectedRow.dob}}in the Default Date property box.
- Rename the widget to
- And finally to view the user's photo, drop an Image widget inside the Form.
- In the Image property box, type
{{usersTable.selectedRow.image}}.
- In the Image property box, type
🚩 You've completed binding the data to the widgets on the Form. Select the rows on the Table to view the corresponding user details on the Form.
Update user details
Select the Explorer tab on the Entity Explorer to the screen's left.
Click the + icon next to Queries/JS.
Select usersTutorialDB query from the list of options.
Rename the query to
updateUsers. Click the white space near the query templates.Paste the below SQL update command in the query editor to update the
userstable in the database with the details modified in the Form.UPDATE users
SET name = {{nameInput.text}},
email = {{emailInput.text}},
dob = {{dobInput.selectedDate}}
WHERE id = {{usersTable.selectedRow.id}}Go back to the canvas by clicking on the User Information page on the Entity Explorer.
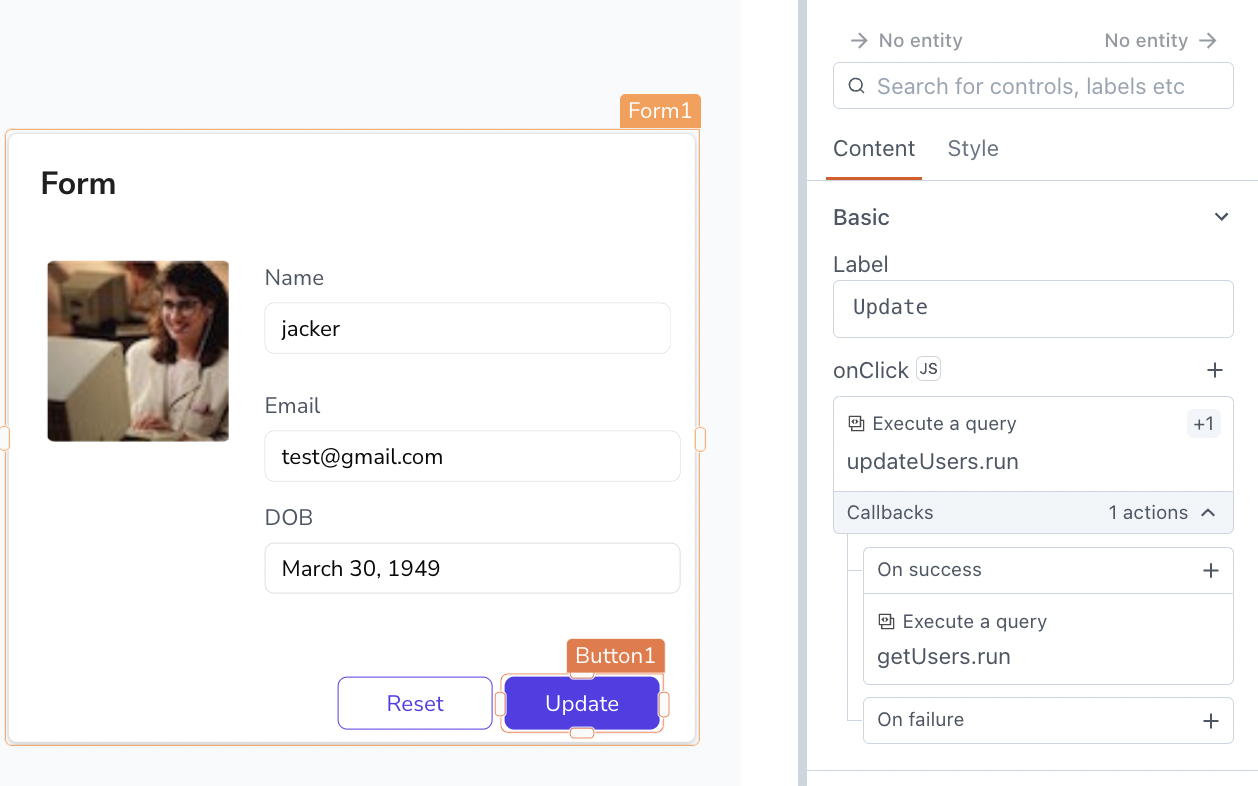
To connect the updateUsers query to a button, select the default Submit button on the Form.
- On the property pane to the right of the screen, in the Label property box, change the label to
Update. - Click the + icon next to the onClick event.
- In the Action list, select Execute a query > updateUsers to run the query on button click.
- Click Callbacks right under the action selector.
- Click the + icon next to the onSuccess callback.
- Select Execute a query > getUsers.
The button is now configured to execute the updateUsers query to save any modified user details on the Form and to refresh the Table widget with the updated information.
- On the property pane to the right of the screen, in the Label property box, change the label to
Click the Deploy button on the top right of the screen to deploy the application and test it in the View mode.
Select the first row on the Table. Go ahead and modify the user's name on the Form and test the Update button to see how things work .
cautionThe databases used in tutorials are public and shared by all Appsmith users, so ensure that you don't input confidential information during testing. The databases are automatically reset every day, so any updates made to these databases are temporary.
🚩 Congratulations! You have built your first app that can display data from the database and save the updated data on the Form.
In this tutorial, you explored a few different widgets and created a simple database GUI to view, query, and update data on a sample PostgreSQL database. You can use these skills to build your own app.
Happy App Building.
